

Have you caught on to the new Kombucha craze yet? It’s pretty amazing stuff.
Kombucha is a fermented drink made from tea, sugar and a culture of bacteria and yeast. It’s naturally fizzy, mildly sweat, and super refreshing. It also happens to be a great source of probiotics, enzymes and a whole host of vitamins (in particular the B vitamins) and other micronutrients. It aids digestion, boosts your immune system and can support gentle and healthy detoxification. You’ll hear every sort of claim from “it cured my headaches!” to “I don’t have gray hair anymore!” but really, what you can expect is a healthy, tasty and refreshing drink that will give you a nice energy boost without resorting to the dreaded sodas. I love the stuff.
The biggest problem with Kombucha is that it’s so dang expensive! I’ve seen a 16oz bottle run from $3.99 (that’s a steal!) to as high as $7 or $8! That gets steep in a hurry if you drink it with any regularity. And if the whole family enjoys it… look out!
I’d been wanting to make my own Kombucha for years, and had given it a good go about 5 years ago with very limited success. At the time I found the process complicated and finicky, and just way too much work. I was happy to spend $5 a bottle to have someone else do it for me.
And then I married a guy who loves Kombucha just as much as me, and we had a kid who happens to love it, too. This was getting pricy.
Lucky for me, I learned about a Kombucha brewing method that’s far easier, less time consuming, and more predictable in terms of results than what I’d been doing before. I read about it and was intrigued, and then a girlfriend told me she had a SCOBY baby she was trying to find a home for. Looks like the universal forces were conspiring on my behalf.
The method I’m talking about is called Continuous Brew, and I learned it from the amazing Hannah Crum, otherwise known as the Kombucha Mama. She is the ultimate Kombucha master, and I don’t pretend to have anything near her expertise. But I thought I’d share the basic process I’ve learned from her and have been using successfully for months now, and making this yummy healthy brew for literally pennies a glass and very little work.
Here’s what you’ll need:
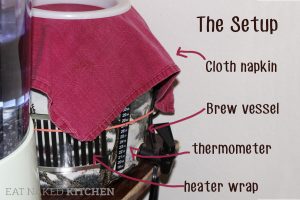
- A continuous brew vessel. We just used an old ceramic water jug (like this). We had it on hand for when we bought filtered water. We dug it out of storage and gave it a good clean, and it does the job beautifully. If you don’t have something like this on hand, check out these great resources. Important: don’t use metal, plastic or crystal vessels.
- A Kombucha SCOBY. This basically your brewing organisms — the “symbiotic colony of bacteria and yeast” that takes your sweet tea and turns it into healthful, probiotic rich yumminess. I got mine from a friend, but if you don’t have a friend with SCOBY babies, here’s the best place to get one.
- A little bit of Kombucha already made. Often SCOBYs come in some kombucha (especially if you’re getting one off a friend), but if you’ve bought a dehydrated SCOBY then you’ll need a little something to help get the process kick-started.
- Organic black tea. I’ve actually come to prefer loose leaf tea, but any tea will do. Just make sure it’s black and organic (like this). Once you’re a Kombucha brewing pro, you can start branching out and experimenting with other teas, but get the basic process down first.
- Organic cane sugar. Yup, this is one of the only times you’ll find straight up good old fashioned sugar on this website. Just like with the tea, this isn’t the time to substitute. Get the process down straight with the regular stuff and then you can experiment with other sugars if you want to. You won’t be drinking it directly — the SCOBY eats it up in the fermentation process.
- A cloth dish towel or napkin. I use an old cloth napkin to cover the Kombucha as it’s brewing. Doesn’t have to be fancy – just has to be natural and breathable (as in: no plastic wrap or any such stuff). Tip: you want to make sure it’s a tight knit fabric, not something with big holes like cheesecloth, which can let in fruit flies.
- Bonus: thermometer wrap for your brewing vessel. Kombucha’s a bit finicky and it likes a narrow temperature range. I bought a thermometer from the Kombucha Mama that is also a heater for the colder days in winter. This is a nice option if you know the temperature in your kitchen varies.
- Clean bottles for bottling your Kombucha. You can use any clean glass bottles, but I like some nice ones with stoppers like this.
Step 1: Get your SCOBY, vessel, and Kombucha ready to go
Clean your brewing vessel with warm water and some vinegar (no harsh detergents or soaps) and towel it down to dry. If you have a dehydrated SCOBY, follow the instructions on the package to rehydrate it. (Sorry I can’t advise on this piece – I’ve never done it before.) Find a nice quite location where your Kombucha won’t be disturbed. We have it tucked in behind our water filter at the back of our kitchen (see above). If it weren’t for the empty Kombucha jars I’m eager to fill, I’d forget it was there completely!
Step 2: Make your sweet tea
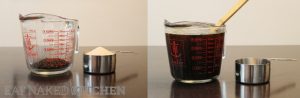
I do this a little differently from a lot of instructions I see online. I combine a liter of boiling water with 10 bags of strong black tea (or the equivalent in loose leaf tea: 1 tea bag = 1 tsp tea) and 1 cup of sugar in a big glass measuring cup. Let it steep until very strong, and then let cool to room temperature (basically your finger goes in and it feels fine).
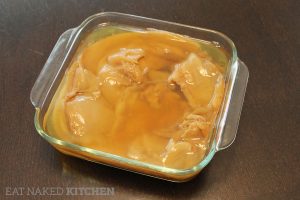
Step 3: Prepare your SCOBY and add starter
Add some already-made kombucha as a starter liquid to your SCOBY if it doesn’t have some already. I like to have at least 2 cups of the starter liquid plus the SCOBY before I add my tea. Basically the more starter liquid you have, the faster your kombucha will brew. Here’s a picture of our beautiful SCOBY, showing herself off in all her glory. Isn’t she pretty? (I know, it takes a bit of getting used to.)
Step 4: Combine SCOBY, starter, sweet tea and any additional water
Add your room temperature sweet tea to the brewing vessel, and then add in the starter and SCOBY. Add filtered water to fill the vessel up to 2-3 inches from the top. Cover the vessel with your cloth napkin, attach with a rubber band, and let it do it’s thing for a good 7 days.
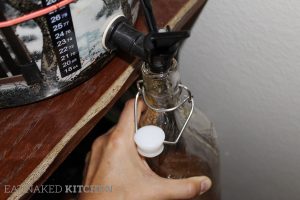
Step 5: Test and bottle
After 7 days, you can test your brew. I just pour myself a sip from the spout. You can also insert a straw past the SCOBY and try it that way. If it’s too sweet, leave it for another day or two. If it’s too tart, you know you don’t need to brew it as long next time.
Once it’s just right, simply fill your bottles with the brew and pop in the fridge. Make sure to leave about a quarter of the tank full with your SCOBY and the brewed Kombucha. This is now the starter for your next batch!
Step 6: Make more tea for your next batch!
Here’s the best part of continuous brew: no handling of the SCOBY, no messy transfers or bottling processes, no fuss. Just make some more tea (see step 2), let it cool to room temperature, and add it to your ready-to-go brew vessel. Add the water just like you did before, and let it do its thing!
I am a TOTAL convert. As you know if you’ve been reading my stuff, I love DIY, but ONLY if it’s easy and not time consuming. And continuous brew is officially that. Once you’ve got it started, all you’re doing is adding tea, letting it ferment, and then bottling (which takes as much effort as filing a couple of water bottles from your tap).
If all of this intrigues you and you want to learn more, I highly recommend checking out Hannah’s site: Kombucha Kamp. It is packed with information, testimonials, tutorials, and gear to make this process easy and fun. Happy brewing!


This is something I’ve been wanting to try so I’ll buy it from a store first to see how I like it and hopefully hubby will like it too. He really likes the Maine Root brand Ginger Brew, so I’m thinking he’ll probably love this!?!
Hi Margaret,
I really want to emulate your kombucha method. I’m starting by finding a used water crock. Is the plastic spigot ok? I thought plastic was a no-no for kombucha. Please advise!
Mine has a plastic spigot and I’m not worried about it. I’m sure there are purists who would say otherwise, but it’s only passing through so very briefly… we haven’t noticed anything detrimental from it.
Can you drink this if you have candida albicans?
People are really divided on that. Some will tell you to stay away from it, others will tell you to drink lots of it. I’m somewhere in the middle. It’s a great source of probiotics (especially if you make it yourself) but I would have no more than 8oz a day.
I’m excited to try this but I don’t do well with caffeine. Can I use a decaffeinated organic black tea?
You can try but I can’t guarantee results. Most kombucha experts will strongly encourage you to go straight up with regular black tea until you get comfortable with the process, but it does involve caffeine. Can’t hurt to try!
Hi Margaret,
When you instruct to add “any additional water” in step 4, how much is that? How do you know if additional water is needed? Or is 1 liter water to 10 tea bags + the 2 cups of starter the ideal ratio (which seems contrary to other recipes I’ve read)?
Marisa – it depends ultimately on the size of your brew vessel. You want to get close-ish to a gallon of water (including tea) – but I have never been strict with the exact amount.
Hi,
Do you ever just pour a glass to drink right from the spigot? I have been making this awhile but just got my continuous brew crock. I have only drank after it’s been bottled a few days.
Absolutely – I often do that. 🙂
Do I need to clean the vessel out after a batch it made? Or when does the vessel ever get cleaned?
Jen, if you’re continually feeding the SCOBY and using the kombucha, you shouldn’t need to clean the vessel. If you notice anything cruddy growing on the sides, by all means do, but usually the activity of the scoby keeps things good. If you leave it and forget to feed it…. that’s a whole other story! Generally speaking you don’t want to handle SCOBYs very often – the less you handle it the better.